Thursday, March 31, 2011

Recycled Milo Can

I finally decided to give it a go at decorating a used can...and it was fun. :D  I used an empty Milo can and just modge podged scrapbook paper on it and glued on some embellishments and voila! Easy peasy.  This would make a super gift I think, and you can fill it up with tea bags, coffee, chocolates or whatever!  Why buy an expensive container when you can recycle your own (& it'll probably end up being much prettier and more interesting than a bought one).

So here's the empty can.  I removed the label of course.  The scrapbook paper wasn't long enough to completely encircle the can, so I cut an extra stip of the paper and modge podged it on first, to cover the gap that would be there:
Then I modge podged the scrapbook paper on, which I had to cut to size first.
Then I just added the embellishments.  I glued on a strip of green patterned paper that was included in a mixed paper pieces package.  This strip was also too short to encircle the can, so I glued the big flower over that to cover the gap.  And then I glued on some green pearls to cover extra strip of paper that I first had to glue underneither:
I used a bronze metallic marker to colour in the bottom rim of the tin that I couldn't cover with paper.
 
I also cut out a circle of the paper and modge podged it onto the lid with a pearl as well:
I didn't know how else to decorate the lid, it being plastic, so I just left it as is, but I think overall it looks fine.  I can't wait to make more! :D

LINKY PARTIES linked to:
Fireflies & Jelllybeans                           Somewhat Simple
The Shabby Chic Cottage                    Rook No. 17
Tales from Bloggeritaville                     Momnivore's Dilemma
It's Sew Stinkin Cute                           What Allie's Making Now
Paisley Passions                                  Rhinestone Beagle
Finding Fabulous                                 Chic on a Shoestring Decorating
It's a Hodgepodge Life                        Lit & Laundry
A Few of My Favorite Things              The Shabby Nest
Fingerprints on the Fridge                    Small Fine Print
Just a Girl                                           Simple Home Life
Truly Lovely                                       Scrappy Gifts 
The Blackberry Vine                           Be Different, Act Normal
A Vision to Remember                        I Heart Nap Time
The Blackberry Vine                           . 

SUBMITTED to:
Going Green Crafters & Artists          .


Monday, March 28, 2011

Beaded Xmas Tree Loops

These little decorations were inspired by the ones I saw on Spoilt Rotten Beads.
I've made these Xmas tree ornaments for My Totally Handmade Christmas Tree Decorations Pledge! :D

Photobucket
Grab my badge in the right side bar & display it on your blog if you wanna join my pledge! :)
These were quite simple and quick to make (it was only the part with the crimp beads that were quite fiddly to do, so be patient there, hehe).  So I've made a tutorial on how to make these ornaments, in case you wanted to make 'em for your pledge as well. ;)

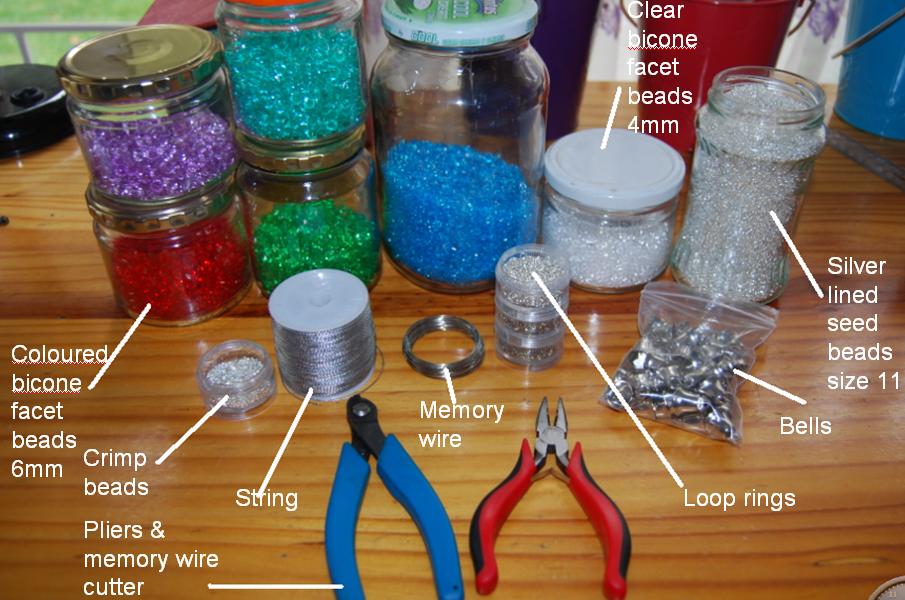
First, this is what you'll need:
an assortment of coloured 6mm bicone facet beads
clear 4mm bicone facet beads
silver-lined size 11 seed beads
crimp beads
loop rings
bells (or your dangly of choice)
memory wire (I used the size that was a few millimeters over 4cm across)
silver string
tools: scissors, pliers & memory wire cutters

First, cut a loop so that it overlaps a little, like this:
Then string on your beads however you like.  I chose this sequence and just repeated it on either side until the ring was full:
String on until the loop is almost full - you'll stop where the loop overlaps:
Now you'll probably have to cut the overlapping wire, just a tad, otherwise it's too long, like in my photo above.  Cut it so that the wire ends no longer want to overlap the beading:
The only way I could think of to secure the wire was to add crimp beads.  So add 2 crimp beads to one side of the wire:
Now slide the other end of the wire into the crimp beads as well:
This is the fiddly part because the beads slide around very easily and could fall off.  But just space the crimp beads on either side of the overlapping wires, so that there's a space between them where you're gonna add your dangly.  Then squish the crimp beads with your pliers so that they secure the wires:
Take a loop ring and add your dangly on it, then close the ring over the centre of the overlapping memory wires:
Finally, take a piece of silver string (I used about 20cm of string) and tie it around the loop ring so that you can hang it on your tree.
And there's your tree ornament! :D
I made some in different colours:
I really enjoyed making these, because they're so simple and relatively quick too. :)

Remember to send me a link of your ornaments if you decided to try 'em out too!

LINKY PARTIES linked to:
The Little Birdie Blog                               Sugar Bee Crafts
Vintage Wanna Bee                                  This & That
Today's Creative Blog                              I'm Topsy Turvy
Rook No. 17                                           Somewhat Simple


Thursday, March 24, 2011

Who Made What? Weekends! Party #15!

This is gonna be a quick post 'cause it's my bed time and I need to get up early tomorrow!  So here goes....

Tnx to everybody who linked up their goodies last weekend, I had fun visiting your blogs. :)

This week's feature from last week's link ups, as voted for by YOU, is.......

......this sheet music dresser by Lori over at The Alligator Box!
Isn't it lovely? It was definitely one of my personal favourites as well. :)  Some time ago I saw someone in blogland decoupage a candle with sheet music and I immediately loved it!  Seeing these drawers covered in sheet music has got me thinking what else might look pretty decorated with sheet music....I think I have an idea already.... :D This should be fun.
Lori has a number of other really great and fancy furniture re-do's on her blog, do pay her a visit and have a look. :)

Well, it's time to link up again! :D  I'm looking forward to seeing what interesting crafts you all have in store for us this weekend! :)


Tuesday, March 22, 2011

Baking Supply Tags

I was in the mood to do something just whimsical and fun, so I made little tags for my baking supplies. :D
Some of my baking supplies are in glass jars and some still in their original packaging, and they were all stuffed in my baking supply section of the pantry.  So I decided to buy more glass jars (well, I still have to buy 'em) and put all my main baking supplies in them, and then make tags for them and move them to a kitchen shelf for display, where they can "brighten" up the kitchen a little, because the kitchen is too boring for my liking, hehe.
(excuse the damaged paint in the background)
So far I have jars for the ready-made (thanx to Nigella!) flapjack (pancake) mix, icing sugar & cocoa powder, so I still have to get jars for the castor sugar, white sugar, brown sugar & baking powder.

Anyway, here's how I made them:
I traced flowers with a stencil and cut them out by hand (some of us aren't yet lucky enough to have a fancy cutting maching, *sigh*).  I cut out the first set out of brown cardboard so that they would be sturdy tags, and then another set out of green paper.
I glued them together and punched some holes where the string would go through:
I used jute, folded the piece in half and strung it through the holes by going in through the top front and out the bottom hole through the back.  Where it came out the front at the bottom, I tied the jute in a double knot and cut off the excess pieces so that it wasn't too long:
The tags were too light and needed to be weighed down, so I decided to hot glue on some glass pebbles.  But first I punched out some mini flowers and modge podged them onto the top of the pebbles, and then added a little bling in the centre:
Then I had to add the labels, so I stencilled a shape onto white card stock and glued it on.  To decorate it a little more I added blings to the labels and a little ladybug (since my kitchen theme is ladybugs).  I went for a garden-y theme for the tags.
Overall I think it would have looked great to paste something directly on the jar instead of making little hangers like I did, but I thought this would be easier for when I have to wash the jars and I don't have to worry about the labels getting water damaged etc.
I think they're cute. :D


LINKY PARTIES linked to:
Rook No. 17                                            Sugar Bee Craft Edition
These Creative Juices                                I'm Topsy Turvy
This & That                                              Today's Creative Blog
Rhinestone Beagle                                    .

Sunday, March 20, 2011

Beaded Watch Bracelet


I've made another bracelet - a beaded watch bracelet this time.  My favourite watch was stolen a couple years ago (boo) and so I've just never got around to buying a new one.  I had this watch face in my beading stash that I bought at least 2 years ago and it's just been lying there...not sure why it was waiting so long to be turned into something useful, but anyway...

Since I've been in the mood to make bracelets these last few days, I thought I'd make this beaded watch bracelet! :D  I stuck to neutral colours (black, silver & clear glass) so that I would be able to wear it with as many outfits as possible:
I made this bracelet a summery garden theme with the use of glass leaves and butterfly charms.
It's so full of different beads that it was a pain in the bum to get a photo showing the beads individually, so this is the best I've got:
Now all I need is a battery for the watch.

While my beading mojo has returned for the time being, I've found myself ordering some more beads online (hehe) - you know how they say you can NEVER have too many craft supplies?  Well, it's true (if not MORE so) for beading. :)  So hopefully my soon-to-be-arriving beads will get some more beading creative juices flowing. :D


LINKY PARTIES linked to:
I Heart Nap Time                            Under the Table & Dreaming
Craft Envy                                      A Vision to Remember
Saturday Mornings                          Fingerprints on the Fridge
Making the World Cuter                 C.R.A.F.T.
Sumo's Sweet Stuff                         I'm Topsy Turvy
This & That                                    Today's Creative Blog

Thursday, March 17, 2011

Who Made What? Weekends! Party #14!

Welcome to this weekend's linky party! :D

I hope you'll join in and show us what creations you've been crafting recently. :)

But first, last week's featured creation, as voted for by you, is Carol from The Answer is Chocolate! She upcycled this can into a lovely storage item:
Isn't it lovely? I love her crafting, she has so many beautiful and elegant creations.  (Plus she has a few yummy chocolatey recipes on her blog too!).  I find her creations really inspirational - take a few minutes to go on over there and check her out. :)

Thanks to everyone who linked up their lovely creations -since I don't always have time to visit ALL my favourite blogs regularly, when I see one of you linking up, it gives me a good opportunity to pay you a visit again. :)

So.....let the link ups begin! :D


.

Monday, March 14, 2011

Purple Beaded Bracelet


I loved this bracelet that I made this past weekend, so decided to make another one! I used purple colours for this one though - I've had these lovely flowery purple fimo beads for AGES but didn't know what to make with them, so I finally used 'em in this bracelet today:
The fimo beads reminded me of a garden, so I went with a garden theme for this bracelet - some of the other charms I added were glass leaves and butterfly charms.
Here's just a close up of the charms I put together:
I love these fimo beads! I've added some more of them in different colours to my online beadshop shopping basket now that I know what I'd like to use them for. :D


LINKY PARTIES linked to:
Sugar Bee Craft Edition                     This & That
Today's Creative Blog                         Rook No. 17 
I'm Topsy Turvy                                Truly Lovely
The Answer is Chocolate                   I Heart Nap Time
Making the World Cuter                    C.R.A.F.T.
Sumo's Sweet Stuff                            This & That
.

Sunday, March 13, 2011

Beaded Bracelet

Making the beaded bookmarks yesterday got me in the mood to make more beaded things, so I made myself a bracelet too!

Here are just some close ups of the different charms I made:
I used prettily painted wooden beads and rounded it off with 2 wooden black beads on either side.
I also added a variety of heart and insect metal charms:

And then I made a few smaller dangly-bead combinations:
Left: a gold splashed bead rounded off with 2 black wooden beads.  Centre: a gold painted wooden disk bead attached to a flower-like spacer.  Right: a jasper stone bead rounded off with 2 wooden beads again.
Left: gold painted wooden bead topped with a spacer and black wooden bead.  Right: a pretty volcano bead rounded off with a spacer on each side.
This is one of my favourite bracelets I've made so far. :D

I've had some other favourite bracelets that I made in the past, but I made them with string and they've all broken after wearing them for a while (some sooner than others) - I'm not sure why. :(  So I prefer to make chain bracelets now.  Here are my poor broken ones:
A fun little daisy chain bracelet.
An ocean inspired seed bead bracelet.
I used the cutest little mini sea shells on this one!
A glass pearl & rose bracelet.


LINKY PARTIES linked to:
Crystal's Craft Spot                                   I Heart Nap Time
Under the Table & Dreaming                     A Vision to Remember
Saturday Mornings                                    Just a Girl 
Fingerprints on the Fridge                          A Few of My Favorite Things 
The Shabby Nest                                      Making The World Cuter 
Truly Lovely                                              Sumo's Sweet Stuff
I'm Topsy Turvy
.