Pages

Friday, December 31, 2010

Cute Garden Greeting Card

PSSST!  Remember to enter my Who Made What? Weekends! party this weekend!


This cute little card I made for Craft Your Passion Challenges, challenge # 38!  The theme is colours: Green, red and cream.  Tnx to them for hosting this fun little challenge!
So I came up with a really cute mini garden greeting card! :D
For the background, I used the colour nearest to cream that I have.  I cut out some grass with green wrapping paper, and glued on some paper flowers, embellished them with some bling and drew in their stems with an ordinary green colouring pencil (the stems aren't the neatest part of the card, but I'm no good in drawing, especially not when I only have ONE chance to get it right, hehe!).  The insects were 3D foam mounted cardboard goodies that I had in my sticker file.
For the sentiment, I stamped "Hi!" using individual little rubber letter stamps, and mounted that on some more cream paper.
And voila!  Cute, huh?! Heh heh...  :)

ENTERED into:
Craft Your Passion Challenges (challenge # 38)                              .

Who Made What? Weekends Linky Party #4

This week's theme is ANYTHING BUT CHRISTMAS CRAFTS! As lovely as all the Xmas crafts and things have been, I'm ready to see something not Xmas related! :)

Here are my rules (and pretty please requests)  :)
*   The usuals - link up to your specific post and not your main blog
                      - no sales posts
                      - it must be your own lovely creations
                      - it must be family friendly - I don't wanna be a meanie and delete it
*   For you super sweet creators - in your post, please link back to my party so that others can find it and join in, or grab my badge in my right side bar and post it somewhere on your blog (else I just feel a little used...*sniff*).  
*   For all you nice creators - be a pal and visit some of the other creations submitted and give some comment love - we all know we love it when our creations are noticed!  :)
*   For now, I think my parties are still quiet enough for you to link up as many of your creations as you want!
*   Oh, and please follow me if you see any of my creations that you like. :)
If you notice your link is no longer here, I've probably deleted it because the link didn't work, it didn't fit in with my theme, or I notice that you continually don't want to link back to my blog in your linked posts - please read the rules (and pretty please requests) and try again, 'cause I'd love to see your crafty creations. :)

I will feature my most favouritist creation submitted! (but only from those who've linked back to my blog) So don't delay, submit today! :)  I can't wait to see what you've all made!


This linky list is now closed.

Party / Celebration Card

This card I made for The Pixie Cottage's Challenge # 50!  Tnx to them for hosting a fun challenge! :)
The challenge was a sketch, and we could combine it with a party/celebration theme:
There is quite a bit of layering in this card:
And I 3D mounted the stamped party themed image (but not before I inked the edges and added some glitter "bubbles"):
And then I used some of the left over scraps to add a little something to the inside of the card as well:
I didn't add any specific sentiment to this card, so that I can be flexible about what I use it for!  But I think the stamp makes it obviously a celebration card. :D
LINKY PARTIES linked to:
All Things Heart And Home                                       Somewhat Simple
Chick On A Shoestring Decorating                            It's A Hodgepodge Life
A Few Of My Favorite Things                                   Truly Lovely 

ENTERED into:
The Pixie Cottage (Challenge # 50)                                        .

Thursday, December 30, 2010

Black, Gold & Silver Card

I've made this card for Creative Inspirations' Challenge # 92!

The theme of this challenge was that you can only use black, gold and silver in making your card, so this is what I came up with:
CLICK ON AN IMAGE TO ENLARGE IT
It's a small card (about 10x10cm). I used white card stock as the base, cut out a black border for the card from some scrapbooking paper, then cut out another border from white card stock, spray painted it gold and glued it onto the black border.
Quite a bit of the decorating ideas for card came about as a need to cover up mistakes that I'd made while making it! Hehe....for example the stamped image.  I stamped the image on the centre of the card within the border, with black ink.  The stamp somehow didn't connect with the paper properly on part of the left side of the image, so I had to come up with an idea to fix it or cover it up!  So I stamped another image on white card stock, cut it out, and 3D mounted it over the other one, slightly off centre for some interesting effect, and to make the missing part of the image disappear under the mounted one.
And also, while I was cutting out the gold border, my blade slipped a tad and I cut a teeny bit into the border on the inside, so I had to find a way to cover that up too!  I was going to embellish the borders somehow anyway, to this mistake wasn't so bad.  I punched out some little leaves from the left over paper that I spray painted gold, and painted another scrap piece of paper with silver paint (I've run out of silver spray paint), and punched out some leaves in silver too.  I arranged them on the corners, glued them, and added a silver embellishment on the stems to cover up the stems.
When I first cut out the black border, I made it too broad (the stamped image did not fit inside it), so I had to cut off some of the inner part of the border...this little piece I stuck on the inside of the card, and added some left over leaves too:
I'm really happy with how it turned out!  I love this little card!  Simple, yet not too plain. :)  I didn't add any sentiment on it, so that I can still have some flexibility in deciding what to use it for.
LINNKY PARTIES linked to:
Somewhat Simple                                                           The Shabby Chic Cottage
Beyond The Picket Fence                                               Chic On A Shoestring Decorating
A Few Of My Favorite Things                                        Truly Lovely 

ENTERED into:
Creative Inspirations (Black, Silver & Gold Challenge)                    .

Fun Summer Greeting Card

I've made this little card (10x11cm) for a Creative Inspirations Challenge, Challenge #91.  (I've missed the challenge due date, but I made the card anyway!)
Here was the challenge layout:
And here's what I came up with!  A fun little flowery summer greeting card:
I've used the colours green, yellow & orange, and purple (the flower and "hello" look blue, but they're purple!).  I used some yellow bling on the borders of the centre square, to make it stand out, since I used the same paper as the background and it kind of faded away in with the background.
For the purple flower, I stamped it onto white card stock, cut it out and 3D mounted it onto the card, and also added an embellishment in the middle of it.  2 of the little sunflowers I also 3D mounted.
For the Hello! sentiment, I used individual little rubber letter stamps to spell out the word. 
And that's it!  A really fun little card to make. :)

LINKY PARTIES linked to:
Blue Cricket Design                                       Nikki's Nifty Knacks
Sumo's Sweet Stuff                                       Krafty Kat
Somewhat Simple                                          The Shabby Chic Cottage
Beyond The Picket Fence                              Chic On A Shoestring Decorating
It's A Hodgepodge Life                                  Scrappy Gifts
A Few Of My Favorite Things                       Truly Lovely 

ENTERED into:
Paper Issues (New Challenge)                      Crafts And Me Challenges (challenge # 20)

My little card was featured at Scrappy Gifts! :D
BWS tips button

Wednesday, December 29, 2010

Pink Butterfly Card

I'm just practising some random card making, so here's my latest one:
I had some lovely soft pink textured paper that I used for this card - I drew lines with a water wet paintbrush and tore it along those lines to create this effect.  Then I stamped on a design at the top using a metallic paint, and when that was dry, I stamped over it again with clear EmbossIt ink and then sprinkled over some clear embossing powder - the embossing didn't make much different to the card, but if you see it close-up you'll notice it a little, so it didn't have the "wow" effect I was looking for, and I think it would have looked better had I not used the coloured paint at all.  Oh well! I did say I was practising here, hehe!
The not-so-noticeable embossing.  I added a butterfly embellishment too.

I bought my first little corner punch (yay!), so had to try it out here - I used it at the bottom of the card, and used some left over pink torn paper and glued it on the bottom inside of the card so that the pink shows through the punched corners.
(I think I put the card a little too far into the stamp, that's why it looks a tad skew here at the bottom).
And that's my little pink card! :)
LINKY PARTIES linked to:
Someday Crafts                                       The Trendy Treehouse
Sew Much Ado                                        *
ENTERED into:
Moving Along With The Times                  Sew Many Challenges
 

Sunday, December 26, 2010

First and Latest Card Challenge

Crafty Cardmakers is having a First & Latest or Greatest Card Challenge - to post your first card ever made (on photo anyway), and your latest or favourite card...so, here are mine entries!
This was the first card I made, it's a b'day card and I used 2 kinds of paper, 3D mounting foam for the "gift" and ribbon to wrap the gift with.  In my defence (hehe), I didn't really have fancy supplies back then (ie in August this year), so this is the best I could come up with.
And this is (in my opinion) my greatest card, made during December this year.  I think I've improved a tad. :D
It's amazing how easy it is to improve when you have the right goodies at hand. :)

Cupcake Liner Crafts - Decorative Goodies

I was going to fill a little plastic container that I'd kept from somewhere with something edible and gift it to someone, but it didn't have a lid, so I used an ordinary white cupcake liner to make a cover for the container.  I ended up finding another cute bottle more suitable for the gift and used that instead, so now I still have the decorated cupcake liner just laying around here - I thought I'd post it here because I think it turned out quite cute, and I imagine one could decorate cupcake liners in a similar way to match any occasion and hang them up somewhere or make a "banner" out of them as decorations:
I flattened the liner and lightly spray painted it green, then after it dried I even more lightly spray painted it with some gold spray paint, just enough for it to spot it with some gold.  I then painted the edges with gold craft paint, and used the same paint to paint on some flowers and decorated them with glitter, and added a teeny little gold ribbon bow to "tie" the flowers together.
This one shows the gold a little better:
I think these could make cute and interesting little b'day or halloween (or whatever!) mini banners.

Wednesday, December 22, 2010

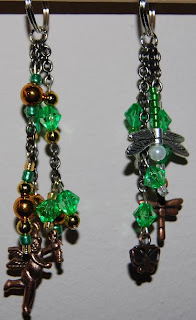
Beaded Keyrings

I got an order today for 7 beaded keyrings! Yay!  :D  I had just enough time today to make them all, and here they are:
CLICK ON AN IMAGE TO SEE IT LARGER
She asked that they all have green in them, and so I played around a little with different designs and charms:


I used a variety of plastic and glass pearl beads, size 8 and 11 seed beads, wooden bead, bicones, findings and charms.  Unfortunately I don't have more detailed pics of these, I literally had no time to take more photos before they had to be delivered!
LINKY PARTIES linked to:
The Shabby Chic Cottage                                       Beyond The Picket Fence
Momnivore's Dilemma                                            A Vision To Remember
A Little Lovely Blog                                               Saturday Mornings
Making The World Cuter                                       The Thrifty Home

A Card for Any Occasion - Card Gift Set

I've made another card set as a gift for another family member - I thought the first ones I made came out so cute, so I had find another person to gift this to, hehe.
For the card I used white card stock, and decorated it with green marble paper.  The top right one I wet the paper with a paint brush and water and tore along the lines I'd made - I like this soft torn effect.
For the bottom left one, I glued on marble paper, and then cut out a piece from a doily and glued it on the card - I think lacy-ness looks cool! :)  To glue the doily to the card, I thought it easiest to use a small sponge paint applicator and dabbed some craft glue all over the back of the doily to glue it down.
For the one in the centre, I cut out white paper with fancy scissors and glued it onto the marble paper, then punched out some cute leaves with the marble paper and glued them onto the white paper.  I think this one is my favourite of the 4!
For the bottom right card, I again painted little squares with water, tore them, glued 'em on and punched out leaves on white paper and glued them on the squares:
I love these little cards! :D They're very simple, yet I don't think that detracts from their prettiness.  I tried to keep them so that they can be suitable as a card for men as well (for some reason I have a really hard time making things for men! I have feminine crafty style, hehe).
Then I packaged them:
 

I packaged them in an ordinary lunch baggie (they work just fine), printed out the "label" goodie and stapled it closed.

LINKY PARTIES linked to:
Nikki's Nifty Knacks                                      Sew Woodsy
Today's Creative Blog                                    A Vision To Remember
Saturday Mornings                                       C.R.A.F.T.
Making The World Cuter                               Until Wednesday Calls