Showing posts with label tutorials. Show all posts

Monday, March 28, 2011

Beaded Xmas Tree Loops

These little decorations were inspired by the ones I saw on Spoilt Rotten Beads.
I've made these Xmas tree ornaments for My Totally Handmade Christmas Tree Decorations Pledge! :D

Photobucket
Grab my badge in the right side bar & display it on your blog if you wanna join my pledge! :)
These were quite simple and quick to make (it was only the part with the crimp beads that were quite fiddly to do, so be patient there, hehe).  So I've made a tutorial on how to make these ornaments, in case you wanted to make 'em for your pledge as well. ;)

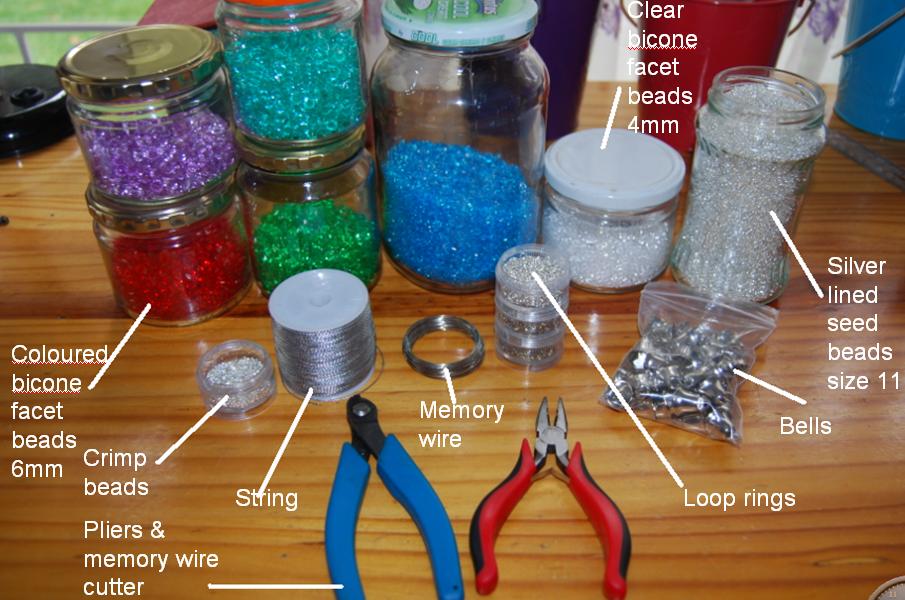
First, this is what you'll need:
an assortment of coloured 6mm bicone facet beads
clear 4mm bicone facet beads
silver-lined size 11 seed beads
crimp beads
loop rings
bells (or your dangly of choice)
memory wire (I used the size that was a few millimeters over 4cm across)
silver string
tools: scissors, pliers & memory wire cutters

First, cut a loop so that it overlaps a little, like this:
Then string on your beads however you like.  I chose this sequence and just repeated it on either side until the ring was full:
String on until the loop is almost full - you'll stop where the loop overlaps:
Now you'll probably have to cut the overlapping wire, just a tad, otherwise it's too long, like in my photo above.  Cut it so that the wire ends no longer want to overlap the beading:
The only way I could think of to secure the wire was to add crimp beads.  So add 2 crimp beads to one side of the wire:
Now slide the other end of the wire into the crimp beads as well:
This is the fiddly part because the beads slide around very easily and could fall off.  But just space the crimp beads on either side of the overlapping wires, so that there's a space between them where you're gonna add your dangly.  Then squish the crimp beads with your pliers so that they secure the wires:
Take a loop ring and add your dangly on it, then close the ring over the centre of the overlapping memory wires:
Finally, take a piece of silver string (I used about 20cm of string) and tie it around the loop ring so that you can hang it on your tree.
And there's your tree ornament! :D
I made some in different colours:
I really enjoyed making these, because they're so simple and relatively quick too. :)

Remember to send me a link of your ornaments if you decided to try 'em out too!

LINKY PARTIES linked to:
The Little Birdie Blog                               Sugar Bee Crafts
Vintage Wanna Bee                                  This & That
Today's Creative Blog                              I'm Topsy Turvy
Rook No. 17                                           Somewhat Simple


Wednesday, December 15, 2010

Sandwich Baggie Wreath Tutorial

As mentioned in my first post about this wreath, I got this idea from Krafty Kat!  So I decided to make my own little tutorial for this wreath as well.  And.....here it is:
Here are the tools you'll need for this project...
Wire hanger (or just some wire if you have no hangers)
Plastic sandwich baggies - not the zip-lock ones (I used small ones, and I think I used about 180 of them)
Glue gun
Decorations

First, if you're using a hanger, bend it until it's (more or less) round:
Also bend the hanging part of the hanger downwards to create a hook.
Now start with the baggies.  Scrunch it up a bit lengthwise - this just makes it more manageable to work with:
Start tying them around the hanger:

Just make single knot.  "Fluff" out the ends again, because they'll most likely be squished after you've tied the knot.  Push it all the way to the end, and start tying the rest of the baggies.  Push them all tightly together so that your wreath looks as full and fluffy as possible.
While adding the baggies, spin some of them around the hanger so that they fluff out and so that you don't see a row of knots...like this:
Then keep going until you can't fit any more on there:
And then decorate (if you want) by hot gluing ornaments to it:
And then enjoy your cute little wreath. :D

My wreath is featured in the "How to Make Wreaths: 15 DIY Wreaths for Christmas" eBook!  :)


Monday, December 13, 2010

Crafty Recycling - Recycled Card Ornaments Tutorial

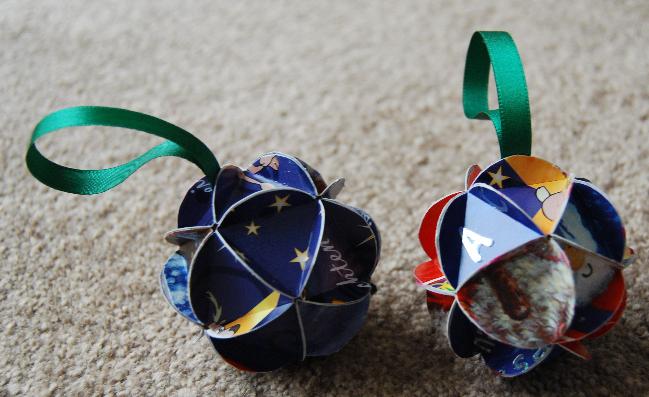
I found these cute little decorations/ornaments on Martha Stewart's site, so decided to give it a try, and thought it's a good way to use cards you've received that just end up taking up space, you never really look at them again, but you don't really wanna throw them away either - well, this is me anyway.  But of course you can also make them for any occasion using pretty card stocks or your own painted or stamped papers etc.
So I've made a tutorial that's a little more in depth than on her site, and here it is:

This is what you'll need:
old cards (at least 2, depending on the size, since you'll only use the sides that have pretty prints on them)
craft glue and paint brush
scissors
sharp pencil
something to trace a small circle with (an ordinary 25g glue stick works well, and is the size of what I used)
protractor and compass (haha, well I wanted mine as neat as I could get!)
ribbon
glue gun

And here we go!

For starters, you'll need to trace and cut out 20 circles on your cards/paper:
Then cut out 1 extra circle and draw an equilateral triangle in the circle, making sure all 3 points touch the edge of the circle, then cut out the triangle.  This is where I had to bring in my husband and my protractor and stuff to help me make the perfect triangle! 

Anyway, once your triangle is cut out, place it on the back of the circle, and trace it on all 20 circles you cut out.  Once it's traced, you then need to score each line so that it folds easier:
This gets a bit tedious, but you'll survive!

Then you need to fold on every line in such a way that you're folding towards the coloured side of the circle, so that they look like this:
Now you take 5 triangles and glue 2 of each of their sides together to form the top of the ornament, like so:
Then you do the same for the bottom part of the ornament:
Next you take all remaining 10 triangles and glue them together so that they form a straight line instead of a circle like the above one, like so:
And then glue to the 2 loose ends together to form a circle:
Now you just take the top and bottom pieces and glue them to either side of the circle to form your little ball:

Lastly, cut a piece of ribbon and glue it to the ball to make your little tree decorations (or just leave 'em as they are and throw 'em in a decorative bowl or something).  This is where I do my glue-gunning, under my table, because its wire is so short it can't reach to the top of my table....hehe:
And here they are.....CUTE! :D

LINKY PARTIES linked to:
POSTED on:

My little ornaments were featured on:

Thursday, December 2, 2010

Christmas Gifts 2010 - Part 4 (Easy Christmas Cracker Tutorial)

This year, and for the first time, I decided to make everybody a Christmas cracker!  I love these crackers because it's always fun to see what little surprise you're gonna get, but the ones you buy in the store usually have stupid things in them (the cheaper ones anyway!) and I'm not willing to pay the exorbitant prices for those containing something more worthwhile.
I got a tutorial from the net and was about to following it, when I decided I have a simpler (yet a slightly less fancy, but cheaper!) idea myself, so here are my crackers:

First, let's see what you need for these goodies:
toilet paper roll
tissue paper
cracker
fancy scissors
tying ribbon
fancy ribbon
goodies to put inside the cracker
double sided sticky tape
glue pen (or ordinary glue if you don't have this pen)
Oh, and I almost forgot about these:
ordinary scissors, and
glue dots

Cut out your desired size of tissue paper, and then cut the left and right edges with fancy scissors.  Centre the toilet roll on the paper:
Draw a line of glue on the roll and stick the edge of the paper onto the roll and start rolling all the way to the top:
Draw another line of glue at the end of the paper and stick it to the roll.
Take a small piece of double sided tape and stick it to the centre of the cracker:
Then slide the cracker into the roll and (with a ruler or something thin and long) press the double sided tape to the inside of the roll to secure the cracker in place.  This just helps that the cracker stays to one side and doesn't fall out while you're working with it, or doesn't get in the way while you're adding the little gifts into the cracker.
Squish the paper together at the end of one side of the cracker (so that it's easier to tie the ribbon in place):
Then tie the ribbon into a double knot and curl the ends:
Trim off any piece of the cracker that sticks out (if any):
Now you add your little gifts!  When you're done, tie the other end of the cracker as well and trim the actual cracker if necessary:
Now it's time to decorate!  Measure a piece of fancy ribbon and cut to the required length.  Put the ribbon in place around the cracker (remember to align it in the middle of the cracker, and don't be like me and concentrate only on sticking it down and forgetting all about the ribbon placement), then add some double sided tape to the first side that needs to be stuck down:
You could use glue dots for this as well, but this tape is a little less hassle to work with, and I didn't find it necessary to use the dots here.  Stick that side of the ribbon down, and then add the glue dots to the other side of the ribbon to be stuck down (you can't see them, but trust me, they're there):
Glue dots are quite a bit more sticky than this double sided tape I have, so they should hold the fancy ribbon securely in place for good, especially if you're using a harder/stiffer ribbon like mine.  Double sided tape should work fine with softer ribbons.
Stick the dots down.
And that's it!
If you want to, you can tie some silver ribbon in with the blue ones on the sides (I don't have any silver right now), it'll make them look just a tad prettier and blend in with the fancy ribbon in the middle.

LINKY PARTIES linked to:
Chic On A Shoestring Decorating
Lit And Laundry
A Few Of My Favorite Things
The Shabby Nest
Skip To My Lou
Luv, Laughter And Happily Ever After