Monday, December 13, 2010

Crafty Recycling - Recycled Card Ornaments Tutorial

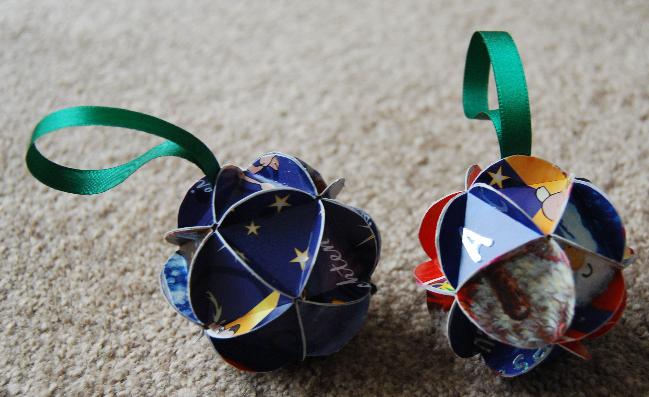
I found these cute little decorations/ornaments on Martha Stewart's site, so decided to give it a try, and thought it's a good way to use cards you've received that just end up taking up space, you never really look at them again, but you don't really wanna throw them away either - well, this is me anyway.  But of course you can also make them for any occasion using pretty card stocks or your own painted or stamped papers etc.
So I've made a tutorial that's a little more in depth than on her site, and here it is:

This is what you'll need:
old cards (at least 2, depending on the size, since you'll only use the sides that have pretty prints on them)
craft glue and paint brush
scissors
sharp pencil
something to trace a small circle with (an ordinary 25g glue stick works well, and is the size of what I used)
protractor and compass (haha, well I wanted mine as neat as I could get!)
ribbon
glue gun

And here we go!

For starters, you'll need to trace and cut out 20 circles on your cards/paper:
Then cut out 1 extra circle and draw an equilateral triangle in the circle, making sure all 3 points touch the edge of the circle, then cut out the triangle.  This is where I had to bring in my husband and my protractor and stuff to help me make the perfect triangle! 

Anyway, once your triangle is cut out, place it on the back of the circle, and trace it on all 20 circles you cut out.  Once it's traced, you then need to score each line so that it folds easier:
This gets a bit tedious, but you'll survive!

Then you need to fold on every line in such a way that you're folding towards the coloured side of the circle, so that they look like this:
Now you take 5 triangles and glue 2 of each of their sides together to form the top of the ornament, like so:
Then you do the same for the bottom part of the ornament:
Next you take all remaining 10 triangles and glue them together so that they form a straight line instead of a circle like the above one, like so:
And then glue to the 2 loose ends together to form a circle:
Now you just take the top and bottom pieces and glue them to either side of the circle to form your little ball:

Lastly, cut a piece of ribbon and glue it to the ball to make your little tree decorations (or just leave 'em as they are and throw 'em in a decorative bowl or something).  This is where I do my glue-gunning, under my table, because its wire is so short it can't reach to the top of my table....hehe:
And here they are.....CUTE! :D

LINKY PARTIES linked to:
POSTED on:

My little ornaments were featured on:

Friday, December 10, 2010

Who Made What? Weekends Linky Party! #2

This week's theme is HANDMADE GIFTS AND ORNAMENTS! (It can be Christmas related, or not).

Here are my rules (and pretty please requests)  :)
*   The usuals - link up to your specific post and not your main blog
                      - no sales posts
                      - it must be your own lovely creations
                      - it must be family friendly - I don't wanna be a meanie and delete it
*   For you super sweet creators - in your post, please link back to my party so that others can find it and join in, or grab my badge in my right side bar and post it somewhere on your blog (else I just feel a little used...*sniff*).   :)
*   For all you nice creators - be a pal and visit some of the other creations submitted and give some comment love - we all know we love it when our creations are noticed!  :)
*   For now, I think my parties are still quiet enough for you to link up as many of your creations as you want!
*   Oh, and follow me if you see any of my creations that you like. :)

I will feature my most favouritist creation submitted! (but only from those who've linked back to my blog) So don't delay, submit today! :)  I can't wait to see what you've all made!
Click HERE to see who was featured! :)

Last week's feature from Who Made What? Weekend Linky Party #1 was......
.......Chrystie over at Pocket Full Of Posies with her Recycled Can Lid Mini Album!


This linky list is now closed.

Wednesday, December 8, 2010

Crafty Recycling - Recycled Table Centre Piece

I wanted to make something cute for the table this year, so I came up with this!:
CLICK ON ANY IMAGE TO SEE IT LARGER
I got some twigs from our garden and spray painted them silver.  I then thought of using an empty can as the "pot" for the "tree".  To anchor the tree, I planted the main twig into a block of styrofoam (which luckily I'd kept from packaging that my craft room storage drawers came in):
 I celotaped the other 2 twigs to this main twig:
And placed it down in the centre of the tin and threw in some spray painted pine cones to keep the tree up right and sturdily in place:
Then I took some silver ribbons and stuck them along the top and bottom of the can with double sided sticky tapes, and glued (with a glue gun) a pretty ribbon around the centre of the can:
Then I got to decorating the tree with teeny tiny pine cones which I spray painted silver as well (tied them on with ordinary beading string), and I glued on little snowflake-y silver glittered decorations (I made them as well):
 
And lastly, to turn it into an even cuter centre piece, I arranged mini gifts around the tree (these are just little Christmas tree ornaments):
Well, I had fun making it, and I think it came out pretty cute! :)

LINKY PARTIES linked to:
All Thingz Related                            
Free Pretty Things For You 
Someday Crafts 
Sew Much Ado 
Blue Cricket Design
We Are That Family 
Sew Woodsy 
Life As Lori 
Black Kat's Design 
Fireflies And Jellybeans 
A Recovering Craft Hoarder 
The Shabby Chic Cottage
Beyond The Picket Fence 
Chic On A Shoestring Decorating 
It's a Hodgepodge Life 
A Few Of My Favorite Things 
The Shabby Nest 
Texas Monkey
Not So Crafty 
Tales From Bloggeritaville