Showing posts with label Handmade Xmas Tree Decor Pledge. Show all posts

Wednesday, January 11, 2012

More Xmas Tree Decorations - A Bit Late, But Oh Well

Shew, haven't had much time for posting around here since Dec - I was so busy then.  But I made 2 more tree ornaments that I haven't posted yet - ornaments that I decorated or made in the spirit of my Totally Handmade Xmas Tree Decorations Pledge. :D
I made this at the last minute in an attempt ot make the tree look more full of decorations, and to add some more "shiny" to the tree.  So I glued a mini gift bow to a mini wood slice and added a silver string with which to hang it with.  Not my most inventive creation, but I was desperate and had run out of time to think up something cuter, hehe.

And then I also wanted to redo some plain baubles that I had and spice them up a bit:
I decoupaged them with pieces of white mulberry paper:
Added some red lace ribbon from my scrap ribbons stash, as well as a white organza ribbon bow, and voila!
So that was IT as far as my Xmas tree decoration went. :)  This year I'm going to be making some more, I need some bigger items to fill up my tree more.


.

Saturday, December 10, 2011

Xmas Tree Decorations

This year I decided, for fun, that I'd only decorate my tree with ornaments that I've made. :D  Ok, so it's not as sparkly as it always used to be, but at least I can look at it and say I made it all, which is much more fun, eh? :)

Here's my tree....somehow December sneaked up on me this year, so I haven't fnished making all the ornaments yet (I'm still busy making some), so I'll post my updated tree as soon as I've finished my other ornaments. :)
The big star hanging above the tree I got from Birgit's Daily Bytes, and it's so easy to make.  I had a hook in the ceiling so I just hung it up from there and placed the tree underneath, hehe.
I also suddenly realized that I didn't have a topper for my tree, and it looked quite odd without one, so I made a little angel to put on top.  Not my best work, but desperate times call for desperate measures:
I used a small styrofoam ball to make the head, and glued one different lengths of gold "string" to make the hair.  I folded a piece of ordinary white paper into a cone for the body / dress.  I stuck a toothpick in the head and inserted it into the top of the cone, then cellotaped and glued the toothpick to the inside of the cone to secure the lot.  I drew on some designs with a glue pen and sprinkled on gold glitter, then finally wrapped some gold ribbon around neck.  Well, it'll do for this Xmas. :)  This was far to finicky to make, so I won't be doing that again!

And then here are some of the ornaments I made last year and thought out this year:
My glittered wooden star ornaments.  I made them HERE.

I made these ornaments from old Xmas and b'day cards...I made them HERE.

These beaded loops with the bells I made HERE.

I collected a whole bagfull of pinecones at our family farm last year Oct.  I spray painted some of them gold last year for decorating the table for Xmas lunch, but this year I just placed them in the tree to add some more colour.

I made some beautiful snowflakes too, and you can find the link to the pattern in my post HERE.

I made some more beaded loops for the tree, but replaced the bells with angels this time.  I made the little angels as well by using little wings, a lovely filigree bead as the body and a cracked glass bead for the head.  Easy peasy. :)  I also used earring hoops this time instead of memory wire as with my other beaded loops above - I find using these earring hoops MUCH easier that the memory wire - it costs a bit more, but oh well, it's worth it. :)

And I made these recycled little prezzies for the tree HERE.

And finally I made these crystal danglies.  I haven't made a post about them previously.  I just used tigertail wire and threaded on a filigree bead and clear acrylic beads, and secured them with crimp beads.  I made a loop at the end of the danly with the tigertail and attached another dangly to the bottom - for the dangly I added 2 sizes of acrylic bicones onto a head pin.  Lastly I used some irridescent "string" to make a little bow with.

And that's my tree so far!  Now I have some more Xmas gifts to wrap and then I need to get on with the rest of my ornaments! :D

All these ornaments were made with my Totally Handmade Xmas Tree Decorations Pledge - if you wanna join in this year or next year, grab my badge here (just scroll to the bottom) and remember to let me know if you made any of your own Xmas tree decorations! :)


Linked up at these LINKY PARTIES:
Cup of Delight         Sew Stylish Boutique

Sunday, November 6, 2011

Crafty Recycling - Xmas Tree Decorations

This is another craft as part of my Totally Handmade Xmas Tree Decorations Pledge for 2011. :D

I got this cute idea from City Girl Gone Coastal, and I thought it'd make really cute Xmas tree decorations.  So I went looking in some boxes in our storage room to see if I could find styrofoam, and guess what?!
I found some and decided to sit in the sun and cut it up.  It's such a lovely day today outside!
My kids kept me company...
I recycled some used Xmas wrapping paper from Xmas's gone by, and wrapped up the little blocks of styrofoam:
Too cute! :D
When I finally find my beading gut somewhere, I'll make some loops to tie onto the gifts so that I can hang them on our tree. :)

So if you want to take the pledge with me, grab my badge for your blog HERE, and post a link of any of your handmade Xmas tree decorations! :)

Also posted here:
GGCAA           .


.

Friday, October 14, 2011

Beaded Snowflakes for Xmas Tree

In the spirit of my Handmade Xmas Tree Decorations Pledge, I've made a set of beaded snowflakes to add some sparkle to the tree. :)
The pattern for this gorgeous little snowflake can be found on Sandra D. Halpenny's website.
If you want to join my handmade decorations pledge, grab my badge here (scroll to the bottom)!  And leave a comment here if you have a handmade tree decoration you'd like to share, I'd love to see it. :)
LINKY PARTIES linked to:
Craft Envy                              .


.

Monday, March 28, 2011

Beaded Xmas Tree Loops

These little decorations were inspired by the ones I saw on Spoilt Rotten Beads.
I've made these Xmas tree ornaments for My Totally Handmade Christmas Tree Decorations Pledge! :D

Photobucket
Grab my badge in the right side bar & display it on your blog if you wanna join my pledge! :)
These were quite simple and quick to make (it was only the part with the crimp beads that were quite fiddly to do, so be patient there, hehe).  So I've made a tutorial on how to make these ornaments, in case you wanted to make 'em for your pledge as well. ;)

First, this is what you'll need:
an assortment of coloured 6mm bicone facet beads
clear 4mm bicone facet beads
silver-lined size 11 seed beads
crimp beads
loop rings
bells (or your dangly of choice)
memory wire (I used the size that was a few millimeters over 4cm across)
silver string
tools: scissors, pliers & memory wire cutters

First, cut a loop so that it overlaps a little, like this:
Then string on your beads however you like.  I chose this sequence and just repeated it on either side until the ring was full:
String on until the loop is almost full - you'll stop where the loop overlaps:
Now you'll probably have to cut the overlapping wire, just a tad, otherwise it's too long, like in my photo above.  Cut it so that the wire ends no longer want to overlap the beading:
The only way I could think of to secure the wire was to add crimp beads.  So add 2 crimp beads to one side of the wire:
Now slide the other end of the wire into the crimp beads as well:
This is the fiddly part because the beads slide around very easily and could fall off.  But just space the crimp beads on either side of the overlapping wires, so that there's a space between them where you're gonna add your dangly.  Then squish the crimp beads with your pliers so that they secure the wires:
Take a loop ring and add your dangly on it, then close the ring over the centre of the overlapping memory wires:
Finally, take a piece of silver string (I used about 20cm of string) and tie it around the loop ring so that you can hang it on your tree.
And there's your tree ornament! :D
I made some in different colours:
I really enjoyed making these, because they're so simple and relatively quick too. :)

Remember to send me a link of your ornaments if you decided to try 'em out too!

LINKY PARTIES linked to:
The Little Birdie Blog                               Sugar Bee Crafts
Vintage Wanna Bee                                  This & That
Today's Creative Blog                              I'm Topsy Turvy
Rook No. 17                                           Somewhat Simple


Wednesday, March 9, 2011

Mini Beaded Wreath for Xmas Tree - Tutorial

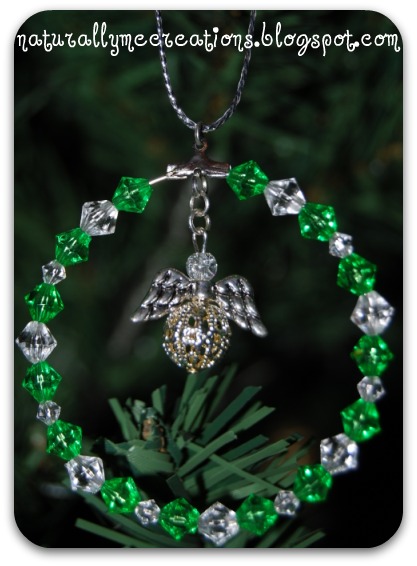
I've made another little decoration for my Xmas tree!  (yes, I know what time of year it is, hehe)  I love how it turned out, it's so cute! :D  It was actually inspired by THIS beautiful beaded wreath that I found on Brittany's blog, Sew In Love.
What made me try out this little creation is Crystal's Craft Spot Crafting With Crystal challenge! The inspiration for this month's challenge is this:

Remember my Totally Handmade Christmas Tree Decorations Pledge?  Well, this is part of it, and I'm starting early because there are a few things that I want to make throughout the year!
Photobucket
Grab my pledge badge in my side bar if you wanna join me! :D


I've decided to make a tutorial out of this one, so here goes:
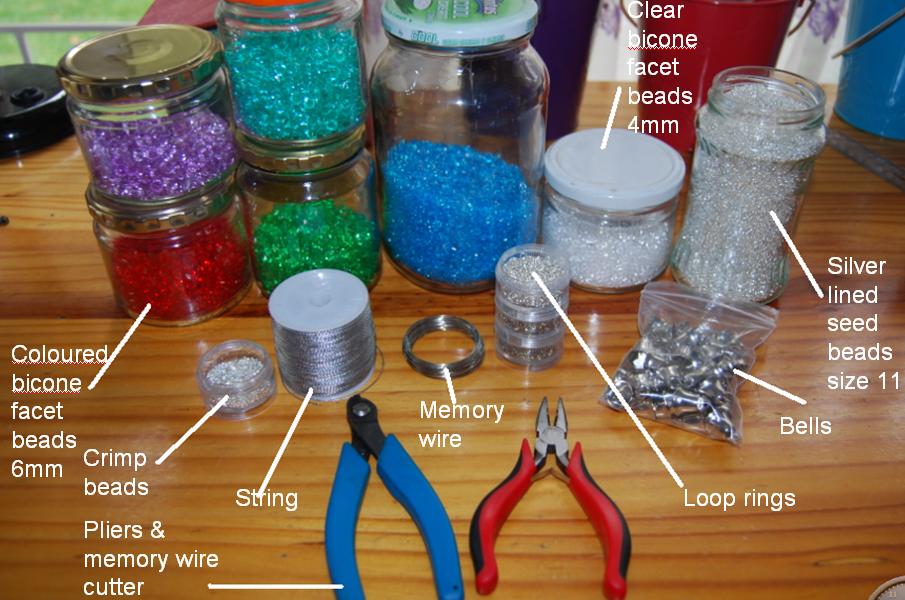
What you'll need is this:

*gold beading wire
*3 colours size 11 seed beads
*beading pliers to help with twisting the wires (optional)
*beading wire cutters
*fabric ribbon
*craft glue (optional)


I started off with gold beading wire, and looped it 5 times around 3 fingers:
The ends should overlap a little:
And then twist them together:
 
Then bend it over and twist it around the circle to secure it:
(I added a loop ring at first because I had other ideas of how to make it dangly, but then I got another idea and just left it - so ignore that loop ring you see there!)

I then cut 3 strands of wire (each about 45cm long) and twisted them together at one end to secure them:
Then with the free ends, start stringing on the beads (1 colour per strand):
Once I strung on all the beads on a strand (I strung on about 30cm of beads per strand - it could have gone a bit more to give a fuller wreath at the end), I added prestik to keep the beads from falling off - I didn't want to ruin the wire by bending it...but do whatever suits you best - as it turns out, using prestik ain't such a good idea.

Once you've stringed on all the beads, start plaiting them together as you would an ordinary 3 strand hair plait:
Then take the twisted piece that you made before you strung on the beads, and wind that around the top (the part where you twisted together the end of the wires in the beginning and wound them around the wreath) of the wreath to secure it.  I used my pliars here because I wanted it to be properly secured.  Then you just carry on winding the bead plait around the wreath until you get to the end:
This is where I found out that using prestik wasn't the greatest idea:
Anyway, once I got most of the prestik off, I twisted the wires together at the end to secure the beads, and cut off the extra beading wire:
And then wound the twisted piece around the wreath to fasten it:
To decorate the wreath, I used green ribbon to make a teeny little bow.  You'll also need another piece of ribbon to make the dangly part:
I took the piece of ribbon and tied it around the wreath to my desired length, and cut off the extra ribbon:
I added some craft glue to the insde of the ribbon to help it stay in place so that it doesn't move around.  I glued it over the part where the beading wire ends were wrapped around the wreath, to cover all that up:
It had to dry in the hanging position so that the glue would have contact the whole time, so I constructed this in my pencil holder out of rulers and a paint brush to hang my wreath on (hehe):
And then I glued on the little bow!

If you decide to try it out, remember to send me a link of your project, I'd love to see it! :D


LINKY PARTIES linked to:
All Things Heart & Home                 Blue Cricket Design
The Little Birdie Blog                       Someday Crafts
The Trendy Treehouse                      Fireflies & Jellybeans
The Shabby Chic Cottage                 Beyond The Picket Fence
Truly Lovely                                     It's a Hodgepodge Life
I Heart Nap Time                             Under the Table & Dreaming 
A Vision to Remember                      Saturday Mornings
Just a Girl                                          Fingerprints on the Fridge 
A Few of My Favorite Things            The Shabby Nest
Making the World Cuter                    Hope Studios

ENTERED into:
Crafting With Crystal                                            .