Showing posts with label spicing it up. Show all posts

Saturday, March 17, 2012

Photo Frame Spice-up

I wanted to give my best bud from the UK a photo of her time here when she came to visit me for my wedding in 2010.  I haven't seen her since, until earlier this month when she suddenly decided to come visit again...and I hadn't even started with her frame yet!! So I quickly had to get it done.  Some of her favourite colours were blue, pink, yellow & green and so those are the ones I worked with:
It started out as an ordinary untreated wooden frame:
I painted it white and decoupaged it with torn strips of blue mulberry paper:
I left the corners un-decoupaged to add some interest.
Then I just glued on some flower and voila, done:
I think it's really cute.  I love decorating photo frames. :)

Linked up to these LINKY PARTIES:
Be Different, Act Normal     .

Wednesday, January 11, 2012

More Xmas Tree Decorations - A Bit Late, But Oh Well

Shew, haven't had much time for posting around here since Dec - I was so busy then.  But I made 2 more tree ornaments that I haven't posted yet - ornaments that I decorated or made in the spirit of my Totally Handmade Xmas Tree Decorations Pledge. :D
I made this at the last minute in an attempt ot make the tree look more full of decorations, and to add some more "shiny" to the tree.  So I glued a mini gift bow to a mini wood slice and added a silver string with which to hang it with.  Not my most inventive creation, but I was desperate and had run out of time to think up something cuter, hehe.

And then I also wanted to redo some plain baubles that I had and spice them up a bit:
I decoupaged them with pieces of white mulberry paper:
Added some red lace ribbon from my scrap ribbons stash, as well as a white organza ribbon bow, and voila!
So that was IT as far as my Xmas tree decoration went. :)  This year I'm going to be making some more, I need some bigger items to fill up my tree more.


.

Monday, February 14, 2011

Spicing Up The Front Door - Welcome Door Sign

This project has been on my to-do list since long before Christmas! I'm glad I finally got to it. :D  I wanted to make something with a cute garden theme:

Here's how it started out:

I was going to stencil on some lavender, then decided on a butterfly instead since it's easier.
So I painted the board and the letters with acrylic craft paint:

And then stenciled on the butterfly.  I used the same colour purple, just adding more white to it to get the colours from dark to light purple (dunno why the camera makes my purple stuff look blue!):
It's not so neat - I think I had too much paint on my sponge, but I thought I'd just leave it in case I messed it up trying to make it look better.  I'm not good with painting and I don't have many painting tools and brushes and things.  So anyway!

I added some purple blings to the butterfly (which don't look all that blingy in the photo...) and then spray varnished the board and letters.  I also added some blings to the letters.


I had some holes drilled into the board and used jute as a hanger for the sign:

Then I just glued on the letters, leaves and flowers with a glue gun.  Before gluing the bees, I had to remove their legs otherwise I couldn't get a good glue hold on them...it was kinda gross because it almost felt like I was dismembering a real bee. 


And that's my sign! :D I like how it turned out - something fun and summery for the door. :)

  
LINKY PARTIES linked to:
C.R.A.F.T.                                                  Sumo's Sweet Stuff
It's A Blog Party                                       Craft-O-Maniac
Until Wednesday Calls                            Keeping It Simple
Sew Can Do                                             Skip To My Lou                        
The DIY Show Off                                   These Creative Juices
Sugar Bee - Craft Edition                        Vintage Wanna Bee
This & That                                              I'm Topsy Turvy
Free Pretty Things For You                      Someday Crafts
Trendy Treehouse                                    Rook No. 17
Domestically Speaking                            All Things Heart & Home
Sew Much Ado                                     Blue Cricket Design
Night Owl Crafting                                Creations By Kara
Waking Lucia                                       Fireflies & Jellybeans
Someewhat Simple                               Momnivore's Dilemma
Crystal's Craft Spot                              .

Monday, December 20, 2010

Spicing It Up - Photo Frame Decorating

I thought my dad needed a photo of him and my mum on his office desk, so for Christmas I printed a nice photo of them from our wedding earlier this year, and put it in an ordinary wooden frame:
Of course I couldn't just leave it as is, so I decorated it just a tad:
 
Using a gold metallic leafing pen, I wrote on the frame the date of our wedding (the day the pic was taken), and added some leafy cardboard die-cuts, which, again, I've spray painted gold (it feels like I've been spray painting everything lately!) and glued on with craft glue.
It think it turned out cute. :)

LINKY PARTIES linked to:
C.R.A.F.T.                                        Making The World Cuter
It's A Blog Party                                Keeping It Simple
The DIY Show Off                              Finding Fabulous

Saturday, November 20, 2010

Decorating Picture Frames - My Wedding & Honeymoon

These are the same frames I used for our wedding to do the guest seating plans in the reception hall.  After the wedding I put white "frames" back into the picture frame and added our wedding and honeymoon photos:

The frames looked too bland with just the photos in them (well...not that the photos are bland, but I'm sure you know what I mean!), so for the wedding frame I took some of the decorations we used for the wedding and added some of them around the photos:


And for the honeymoon frame, I added some leaves that I picked up at one of the places where we stayed during our honeymoon:
 Just a little something extra to spice up a picture frame. :)

LINKY PARTIES linked to:
Funky Junk Interiors
Fireflies And Jellybeans

Tuesday, November 16, 2010

Spicing It Up - Curtain Tie-Backs

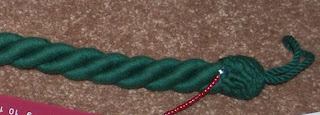
These curtain tie-backs were far too dull for my liking, so I spiced them up a bit:
I chose 3 colours of seed beads (red, green and gold) and wound them around the tie-back.  I threaded the wire through the fluffy part at the ends of the tie-back and used crimp beads to tie the wire securely on each end.
Beading can so often be used to spice some things up around the home!
This is no master piece, but I think it looks better.  And it kept me busy for a few minutes when I wanted something crafty to do. :)

LINKY PARTIES linked to:
Finding Fabulous