Showing posts with label love. Show all posts

Saturday, May 14, 2011

First Wedding Anniversary Gift - Framed Love Poem

On 30 May is our first wedding anniversary! :D

Well I decided to make something for the occasion.  You know how there's this thing where you're supposed to (for fun of course) give certain specific items for every year of the anniversary?  If you don't, you can see it here: Anniversary Gifts by Year.  For first year anniversaries you're supposed to write a love poem to your partner on scented paper....and since neither of us are into poetry and such, I decided to make something from both of us to both of us. :)  I printed out the words (on scented paper!) to the song which we played when I was walking down the isle at our wedding - Annie's Song by John Denver.  It's not so much a love poem, but I like the song and the words were suitable for this project.  So! Here it is....
I took an old frame laying around here (it started out like this one) and painted it dark brown and spray painted varnish over it.  My mum bought me these pretty scented papers for Xmas, and I only planned to use them for special things (that I don't have to give away, hehe), so I used the first one here.  Can you see the roses?

To decorate it further, I used some swirly chipboard cut-outs which I padded with a purple ink pad to colour it in and spray painted varnish over it too to make it look not so dull - and added some blings on too:
And I used a heart chip board goodie, but I only inked the edges this time - I think it looks nice - and glued on a rose.
I also glued on a mini mirror heart (I used these to decorate some things for the wedding too), and added our initials with stickers:
And that's it! I'm really happy with how it turned out. :)  I've put it on the little table in our entrance "hall", next to a wedding photo that I framed HERE too.  :D
 
And then, I had my family over for my b'day last weekend and I made Coconut Snowballs which I topped off with cream cheese icing:
Now get ready for the recipe, because it's quite complicated...

You ready...?

Here's what you'll need to do:

Mix together 1 can of condensedmilk & 750ml desiccated coconut, roll into balls and through some more coconut & chill in fridge.  Whew!

And then I got me one of those huge cupcake mould thingies - and made a huge-@$$ cupcake:
Hehe...anyway, had me some fun with that.  I rolled one of the snowballs in red coconut and used it as a "cherry" to top of the cupcake cake. :)

LINKY PARTIES linked to:
Making the World Cuter    Craft-O-Maniac
The DIY Showoff             All Thingz Related

Sunday, February 13, 2011

Fun Valentine To-Do Chart (& A Chocolatey Cake!)

I got the idea to make this after seeing something that someone in blogland made, except theirs was about fun things to do for children - so I decided to make a Valentine one for couples!  Just for fun. :D

So the idea here is that you write on the tags fun little things for you to do as a couple, and then every day starting on 1 Feb, you'd take a tag and for that day do whatever it says on that tag.  It can be anything from giving each other a massage, to having a romantic dinner at home or a candle lit bubble bath...whatever! :D
What I did was make a list of things I wanted to do and asked my husband to do the same, then I chose the best ones to write on the tags and then swish them around so that you don't know which one you'll get on what day. :)

I took a sheet of scrapbook paper and glued it onto a piece of cardboard of the same size.  Then I made little "pouches", and tags to go inside.

I made the pouches with ordinary printer paper, then cut out patterned scrapbook paper and glued it onto the top surface that you see on the chart:
 
I glued the folded pieces onto the background scrapbook paper to form the pouch.

For the tags, I cut out little pieces from patterned card stock, reinforced it at the back (where I was going to punch the hole) with left over card stock scraps, punched a hole and tied a ribbon through it.  Then I cut out pieces from white card stock, inked the edges and glued that onto the tags - this is where you do your writing on:
 

 A close up of the pouches and tags:
 
I also inked the edges of the entire chart to round it off nicely.

I added numbers to the pouches by cutting out 2 little hearts from red and black paper and writing the numbers on them.  I made this goodie a little late, so it's actually supposed to run from 1-14 Feb.

Then I decorated the "chart" with some more hearts that I cut out and embellished.  This one I added our initials with glitter, and added some white glitter around the edges of the heart (it doesn't show so nicely on the photo):
Here I just glued on some white ribbons with silver trim in a criss-cross fashion and glued on a little organza rose in the centre:
Lastly I punched some holes at the top and tied some jute onto it so that I can hand it up on the wall.

So you could use this every year, and if you wanted to, write on the tags on pencil so that next year you can change the activities.
And here's a delicious cake, called Chocolate Mayonnaise Cake - The good thing is that it's easy to make and you probably have all these ingredients already!
Ingredients:
500ml          cake flour
125ml          cocoa powder
15ml            baking powder
5ml              bicarb
3                  extra large eggs
375ml           sugar
250ml           mayonnaise
250ml           water

1.   Mix dry ingredients together and set aside.
2.   Beat eggs, sugar & vanilla together until light & fluffy.  Add mayo & water gradually, alternating with dry ingredients.  Mix well.
3.   Pour into 2 greased cake tins & bake at 180 degree C for about 35 minutes.

I concocted my own icing here, which didn't turn out all that wonderful because it was way too runny and went all over the place - but I'm sure you have a good icing recipe that you can use! :)  I added some raspberry jam in the middle.

Enjoy! :D


LINKY PARTIES linked to:
I Heart Nap Time                                         Under The Table & Dreaming
Truly Lovely                                                 Chic On A Shoestring Decorating
It's A Hodgepodge Life                                Crystal's Craft Spot 
A Few Of My Favourit Things                      Tatertots & Jello 
Fun To Craft                                                What Allie's Making Now
C.R.A.F.T.                                                       Making The World Cuter 
It's A Blog Party                                           Craft-O-Maniac
Keeping It Simple                                         Until Wednesday Calls
Sew Chatty                                                  So Can Do 
The DIY Show Off                                       The Girl Creative
Sumo's Sweet Stuff                                       . 

ENTERED into:
Crystal's Craft Spot Valentine's Challenge:


My chart was featured on Truly Lovely and Crystal's Craft Spot! :D
Feature Button

Saturday, January 22, 2011

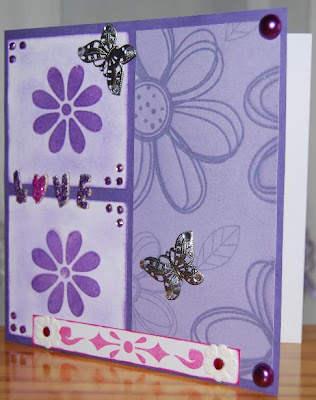
Purple Sparkly Flower & Butterfly Card

Remember to enter my Who Made What? Weekends! Linky Party this weekend!


I made this card for 2 challenges.  Inspirational Card Sketches, Challenge # 98, and Glitterbabe's Challenge, Challenge # 28! I combined IC Sketches' sketch with Glitterbabe's sparkle theme:
Here's the sketch we had to work with:
So, again, I've chosen to go with purple...I just seem to have so much pretty purple stuff! :D
I used purple vellum paper for the background, and then a pretty flowery embossed paper for the right side:
For the left side, I used white card stock cut into squares, I smudged them with purple pencil shavings to colour them in, stamped a simple flower onto them and then embossed over the stamp too:
I also discovered that you can't use a hair dryer as a heating medium for embossing...it seems it ain't hot enough. Boo.  So I did it over the stove again!
I also inked the edges of the white paper:
To go with the sparkle theme, I added some blings around the card, butterflies to which I added blings as well, and a LOVE chip board word that I covered in glitter.  Oh, and the embossed flowery paper and my embossed flowers added some sparkle as well. :)
 And then to complete the design for the sketch, I added this to the bottom of the card:
I stamped a design onto white card stock and inked the edges, added some paper flowers and blings.
And that's my card! :D

LINKY PARTIES linked to:
I Heart Nap Time                                                            .

ENTERED into:
Inspirational Card Sketches (Challenge #98)     Glitterbabe's Challenge (Challenge #28)

Thursday, January 20, 2011

Ladybug Love Card

I made this card for The Pixie Cottage's Challenge # 53!
The challenge this time was a sketch and / or "who do you love?" theme.  I chose mostly the sketch, but combined it a little with the theme too, except I didn't include any sentiments as to who the card is for.
This is a very red and very hearty card. :D

I smudged the whole background of the card (as well as the circle that I cut out from white card stock, as well as the tiny square on the bottom right corner and the hearts on the top left corner), with red pencil shavings.  I inked ALL the edges with red ink too.
The ladybug image is a freebie that I got somewhere on the net providing free 3D decoupage images.  You can see the 3D here:
I cut out 3 little hearts with my Fiskar's shape cutter goodie - I smudged them all, inked the edges of 2 of them and added glitter to the edges of the third one which I 3D mounted:
I also added glitter around the hearts of the main image:
I 3D mounted a small soft blingy heart at the bottom of the card. Underneath I layered red textured paper (the same that I used for the square under the main image), and glued a smaller square of white card stock over that after inking the edges and smudging it too.
Lastly I added some red sequins around the card - I don't have any red blings in my stash...yet.
And that's that. :D


LINKY PARTIES entered into:
I Heart Nap Time                                           Vicky's Attempts At Decorating
Making The World Cuter                                It's A Blog Party
C.R.A.F.T.                                                     Craft-O-Maniac
Keeping It Simple                                           . 


ENTERED into:
The Pixie Cottage                                            Crafts & Me Challenges (Challenge #22)
Crafty Card Makers (Pencils Spotlight)           Freshly Brewed Challenges (Ch. #31)
Paper Issues (Valentine's Day Party)                             .

Wednesday, January 12, 2011

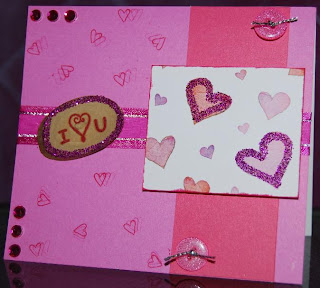
Something New & Something Glittery I Luv U Card

OK, so it seems I'm not taking a break from cards just yet....I just couldn't resist more challenges....hehe!
So, this card I made for 2 challenges!  The first is Glitterbabe's Challenges, Challenge # 26, and the second is Cupcake Craft Challenges, Challenge # 124!
This card was actually inspired by Glitterbabe's challenge, and as the name of their blog suggests, all projects must include glitter, sparkle or bling.  The sketch for this challenge was this:
Cupcake Craft Challenges' challenge was "Something New", so while I was making the card, I incorporated some new stuff I'd just bought yesterday!  This would be my new pink glitter and new buttons! :D  This is also the first Valentine/love card I'm making, and it's the first time I'm using the white hearty paper you see on the card, AND it's the first time I've tried out my hearty stamping idea (see below).  So, plenty of new things here! :)

First I covered the card with pink background paper.  Then I wrapped a sparkly ribbon around the card, and added a piece of darker pink paper over that to match the sketch.
Next I cut out a piece of hearty patterned paper, inked the edges, traced the inside of 2 of the hearts on there with my glue pen, and added some pink glitter!
Then I took a wood slice and stamped onto it "I heart U", traced around the edge of the wood with my glue pen and added some more glitter:
And then I used my new pretty little buttons! :D  AND they have glitter/sparkle inside them too:
I tied some sparkly silver string through them (it doesn't look very silver on the pic....but it is!).


I added some pink bling around the card too.  But.....the card looked a little empty on the left side, so I decided to stamp little hearts onto the background paper to "fill" up that space.  I stamped the heart 3 times in succession, so each stamp was lighter than the previous one, and I like how it turned out! :D
So there's my something new and something glittery card. :)


ENTERED into:
Glitterbabe Challenge (Challenge #26)        Cupcake Craft Challenges (Challenge #124)
Paper Issues (Challenge #NEW)                .